How to Get WhatsApp Cloud API & Integrate it with MessageFury? #
Here is the step-by-step guide to perform the setup without any kind of technical knowledge and that too in less than 10 minutes.
Quick Info #
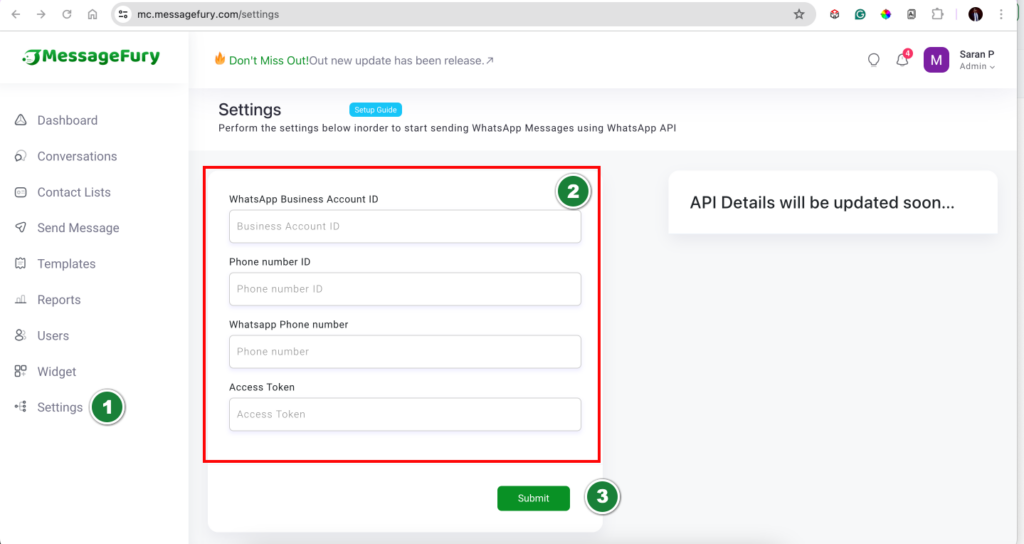
You need to add the WhatsApp Cloud API credentials which can be obtained from the Meta(WhatsApp/ Facebook) Business Page in this settings page of MessageFury.
This documentation will guide you through the steps to obtain these credentials.
A Step-by-step video tutorial is also available. Click here to watch the setup video.
Step 1: Create a Meta for Developer’s Account #
The steps will guide you automatically. You can skip this step if you already have an active Meta for Developers Account.
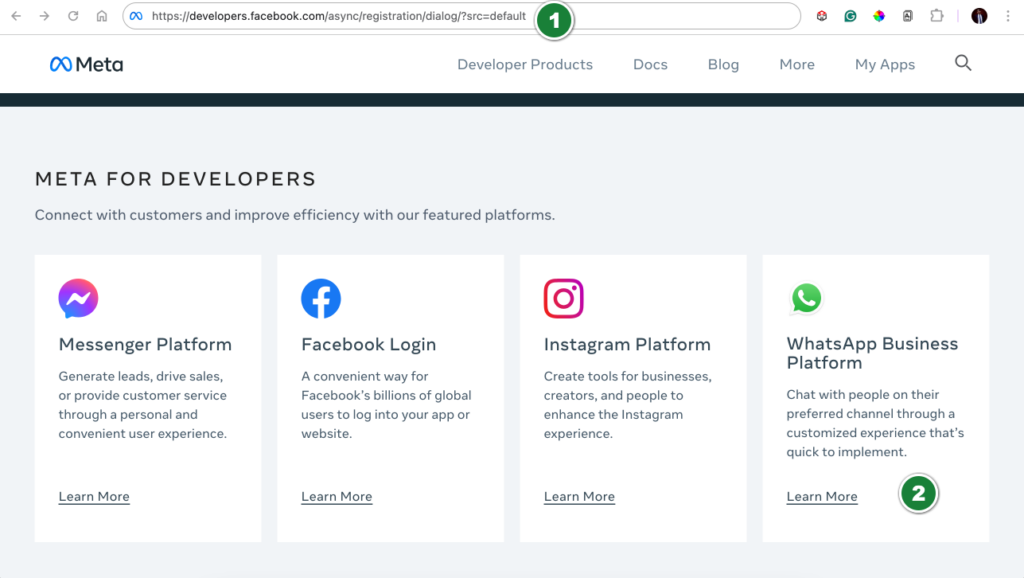
- Go to https://developers.facebook.com/async/registration/dialog/?src=default
- Scroll down and click on WhatsApp Business Platform
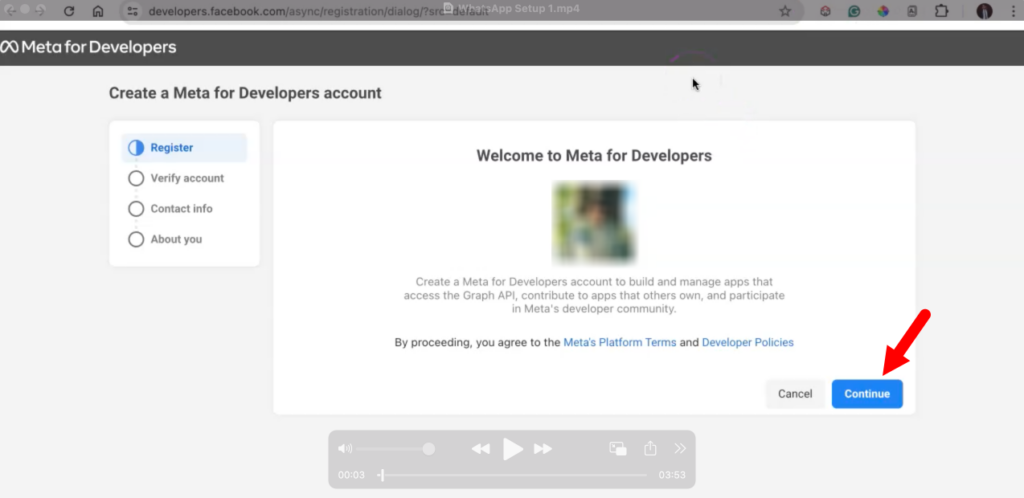
- Click on Continue in the first tab
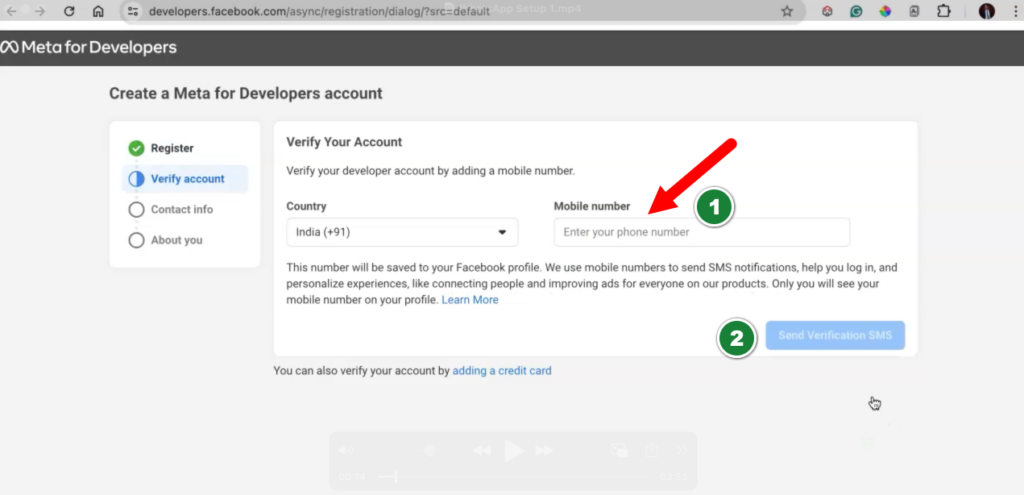
- Enter a valid mobile number as you will receive an OTP on this mobile number.
This can be your personal mobile number or official number.
This will be used only for validation purposes. - Click on Send Verification SMS
- Enter the received OTP and click on Confirm

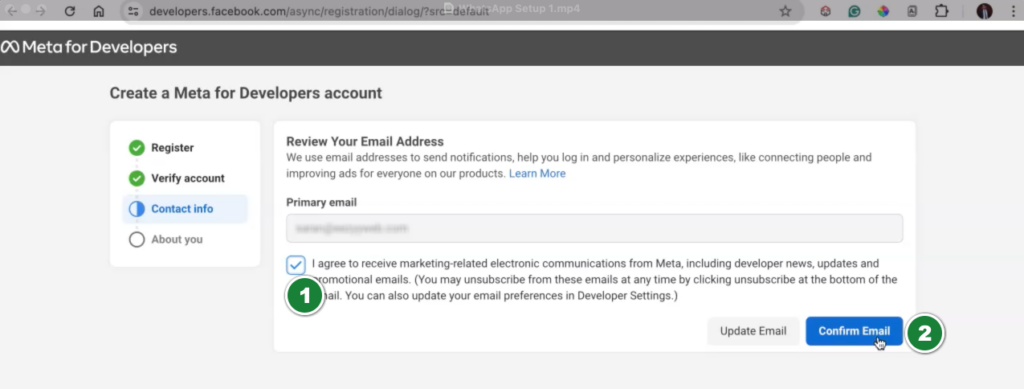
- You need to enter your primary email ID here.
If you don’t want to use your existing email ID with Facebook, you can enter a new email ID as well.
This email ID will be the primary email ID for all kinds of updates about your WhatsApp API.
So make sure to provide an active email id. - Click on Confirm Email upon entering the primary email ID.
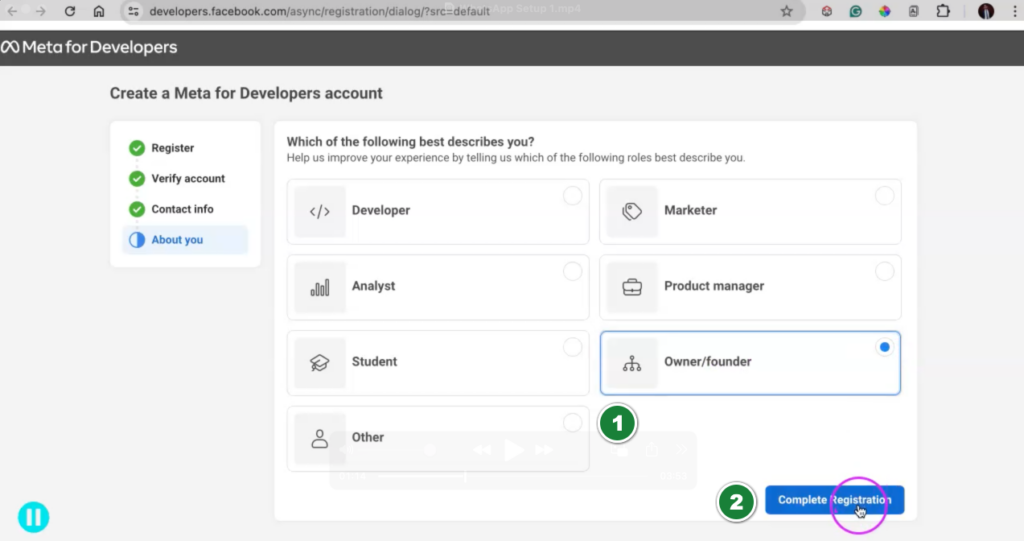
- Select your role in this Business organization for which you are registering the Business WhatsApp API.
- Click on Complete Registration upon selecting the role.
Step 2: Create an App #
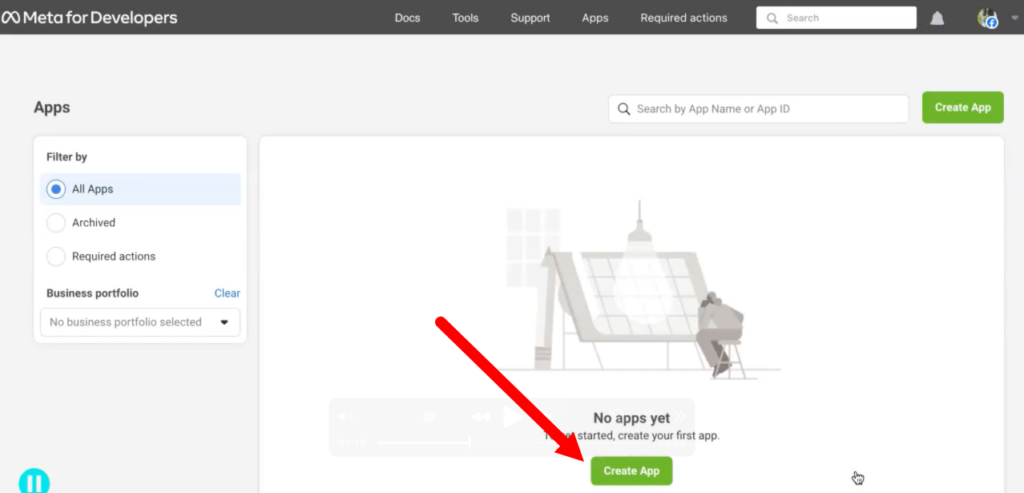
- You will be automatically redirected to the Create App page once you have created a Developer’s account.
- Click on the below link incase if it is not redirected automatically.
https://developers.facebook.com/apps/
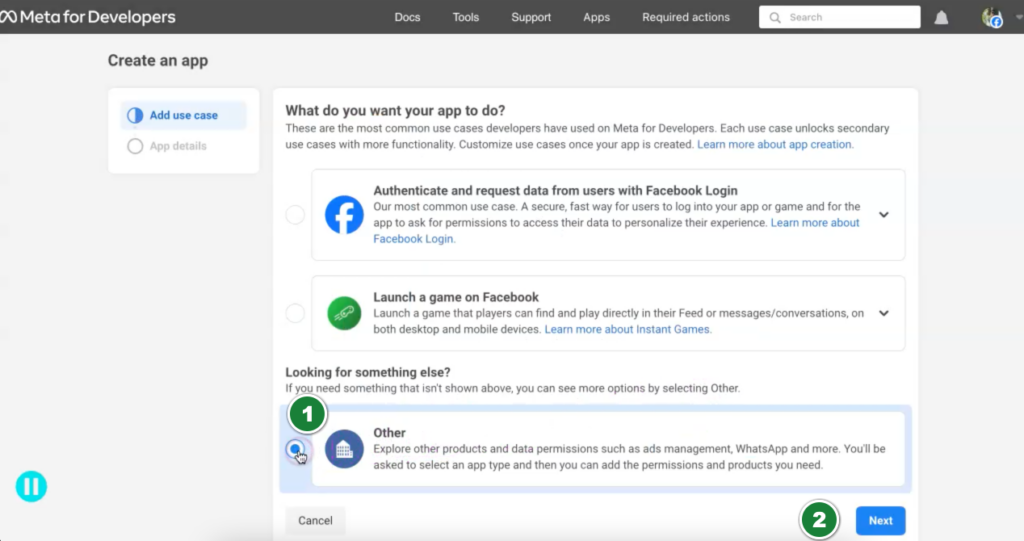
- Make sure to select “Other” under the Use Case Selection.
This will be used for sending the WhatsApp API Messages. - Click on Next
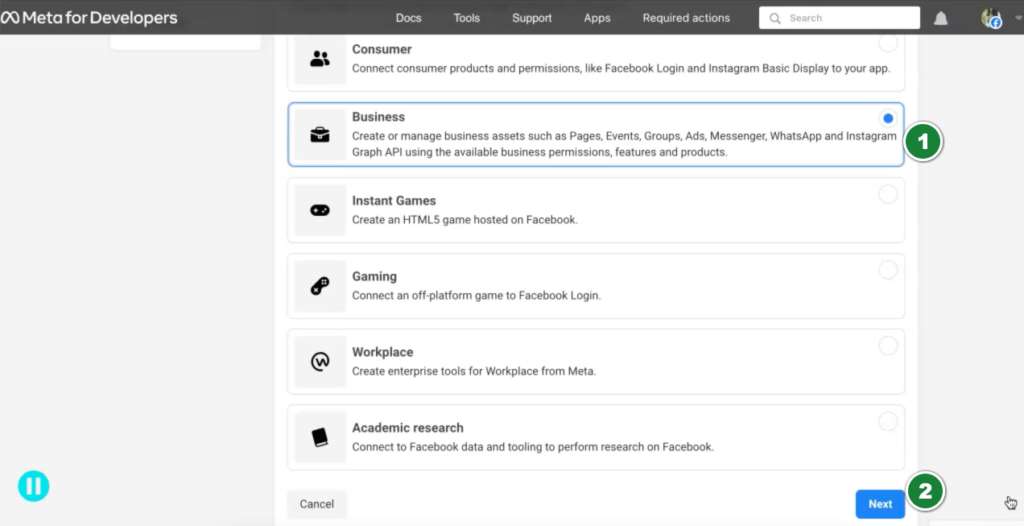
- In the next screen, select “Business”.
In case, if you select the wrong use case or wrong category, then the WhatsApp API will not work.
So, make sure to select the exact use case and category. - Click on Next.
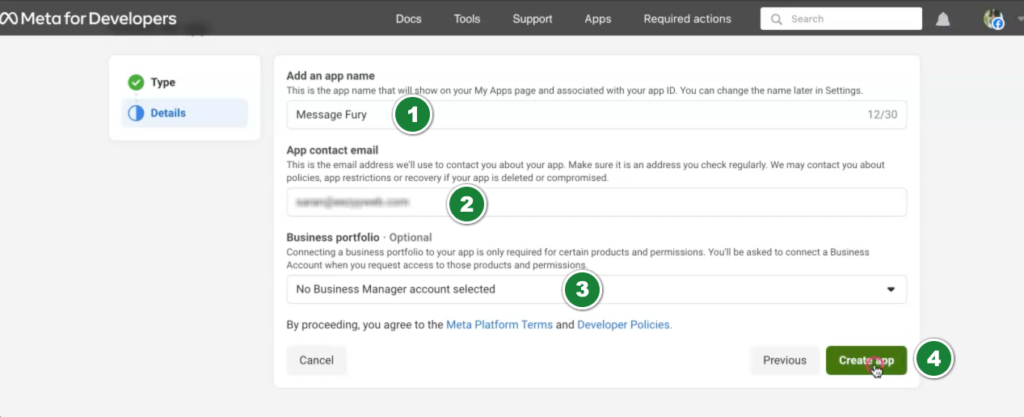
- In the next screen, enter the App Name as “Message Fury” or any other reference name that will be easy for you to identify.
- You can enter the contact email address.
- You can then select the Business Portfolio.
In case, if you don’t have a business portfolio, we will explain the process of creating the Business Portfolio in the next step.
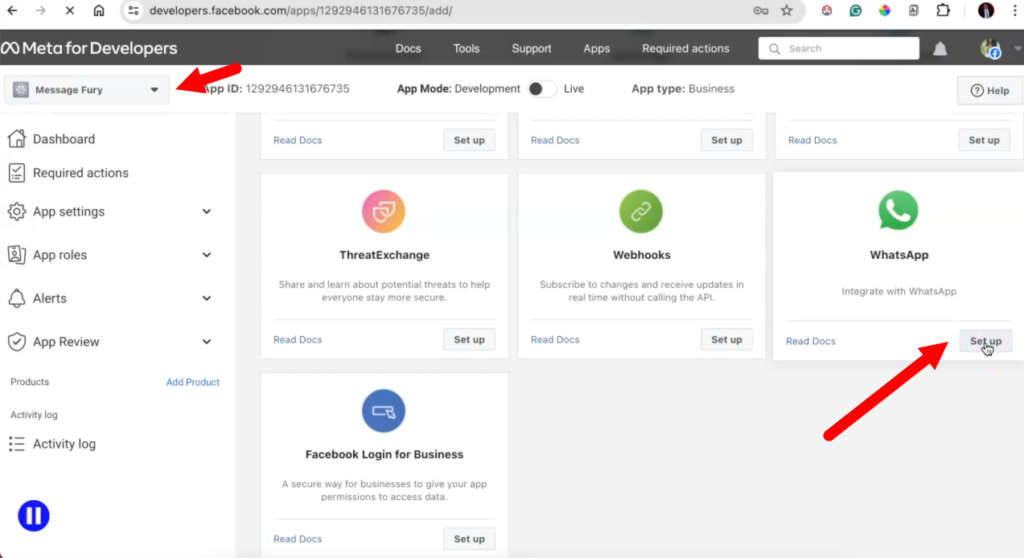
- You will be directed to the App Dashboard.
- You will find the created App Name on the left side top corner.
This will help you to identify in case if you have multiple apps. - Scroll down and you will see the “WhatsApp Icon“. Click on Setup under WhatsApp in order to integrate this App with WhatsApp.
Step 3: Setting up a Basic Business Portfolio #
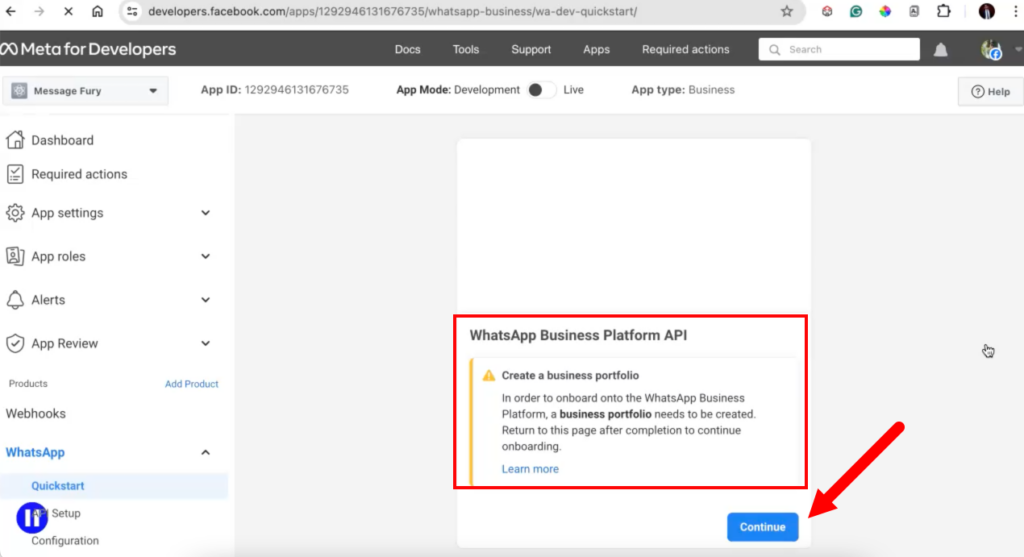
- Once you click on the Setup button under the WhatsApp setup, you will be redirected to “Create a Business Portfolio” in case if you have not selected the business portfolio in the previous steps.
- You can also visit https://business.facebook.com/ incase if it is not redirected automatically to create a new business portfolio.
- Enter your official registered business name.
You should have some legal documents under this name as you need to provide the documents in the further steps for verification. - Enter your official name.
You might need to provide some official documents under this name in case of any issues in the future.
So, make sure to enter your official name.
If your name also appears in the company/ business name registration it will be an added advantage. - Enter a valid business email address.
You should not enter any Gmail or other non-official email address.
It should have been created under your business domain.
For e.g., if your company name is MessageFury and your website domain name is messagefury.com, then you can give an email ID like info@messagefury.com or yourname@messagefury.com - You will receive a validation email in your official email ID once you click on Submit. So, make sure to enter an active email ID.
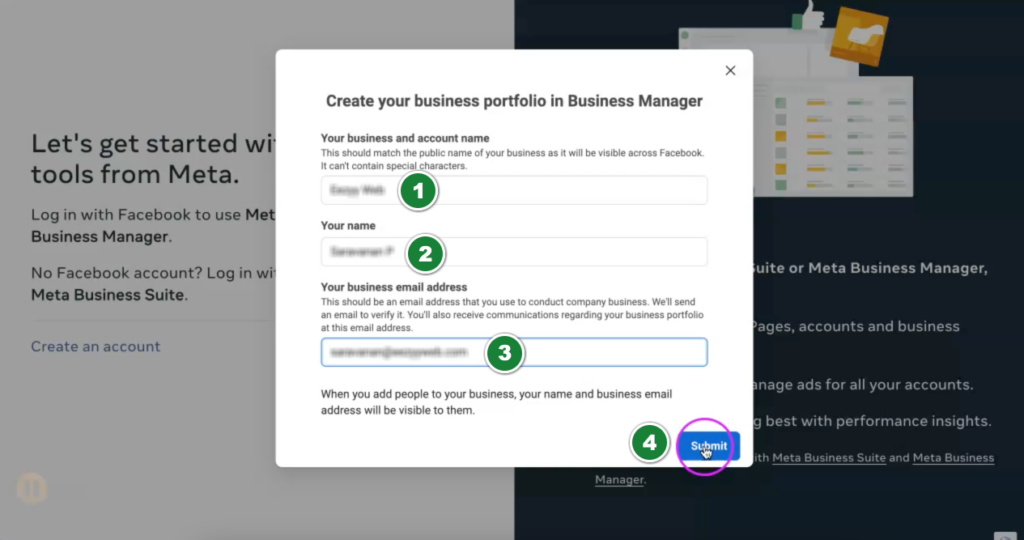
- You will receive a validation email in your official email ID once you click on Submit
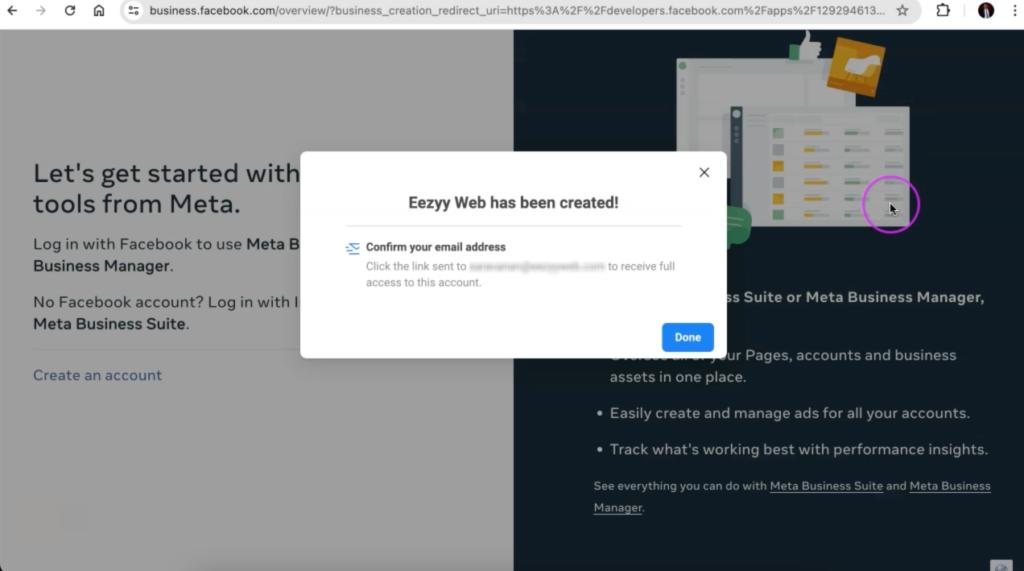
- Check your email and verify the Business Portfolio.
- Once you click on the link in your email, you will be redirected to the business portfolio page where you will get a confirmation that “Your email address has been verified“
- Make sure the created Business Portfolio is selected on the top left side.
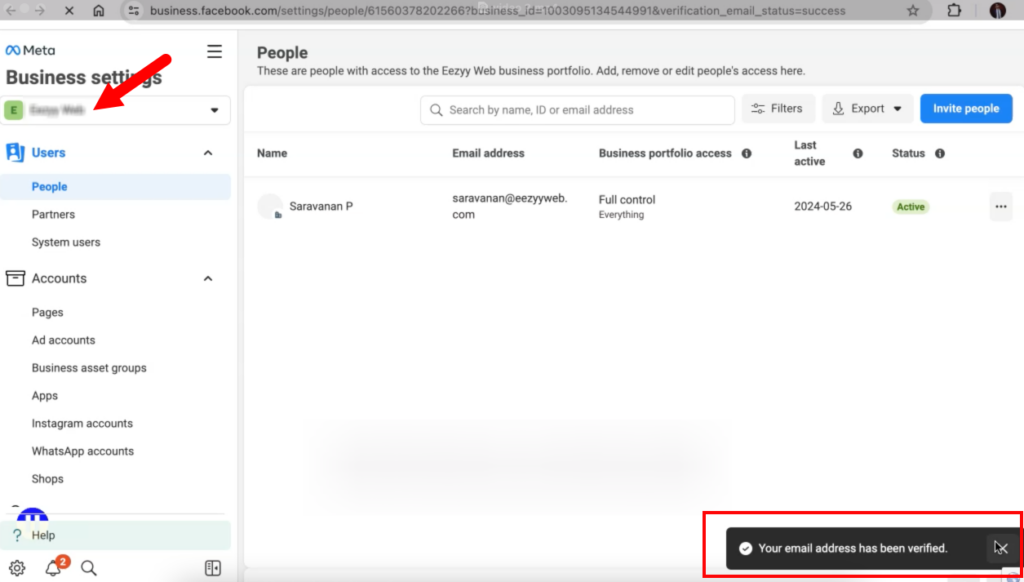
Step 4: Collect & Configure the API to Start Sending Messages #
- Go to https://developers.facebook.com/apps
- You will find the list of apps and in that, you will find the new app that we have created now for configuring the WhatsApp API.
- Click on the new app that you have created.
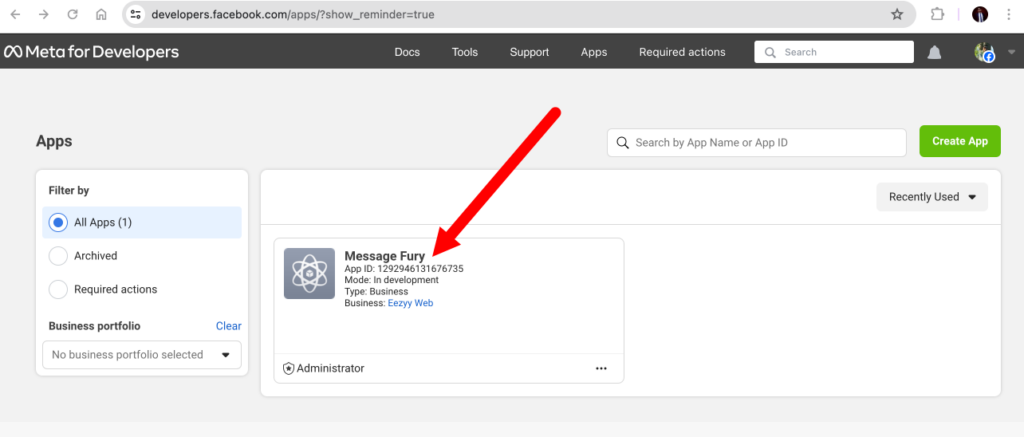
- The current status of the app is in “Development” Mode.
We need to make that to Live Mode - In order to do that, click on App Settings on the left menu and then click on Basic.
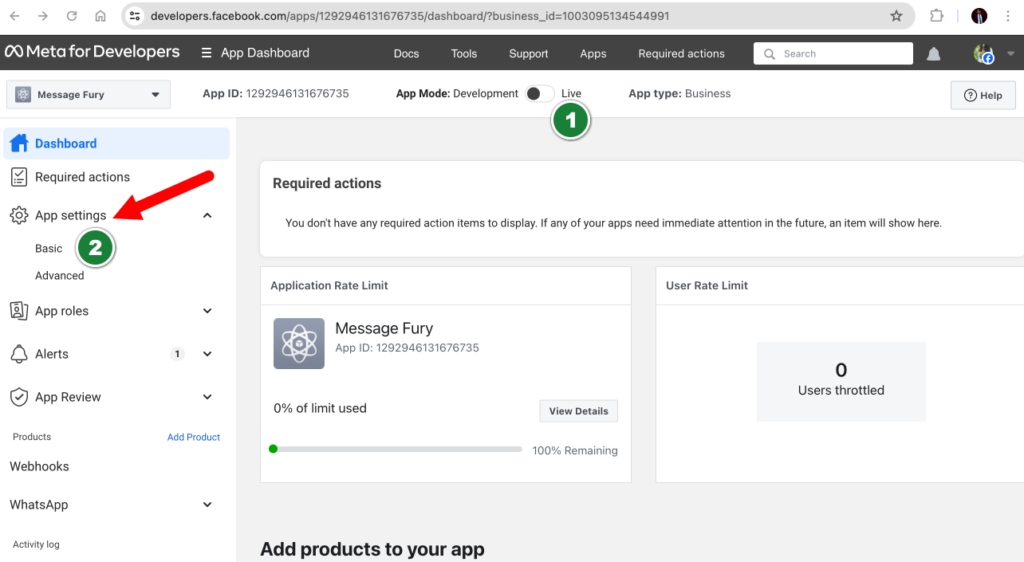
- On the next page, make sure to enter the privacy policy and terms of use.
You can add this from your website or you can take it from messagefury.com as well. - Click on Save Changes.
- Once this is done, you can change the App Mode from Development to Live.
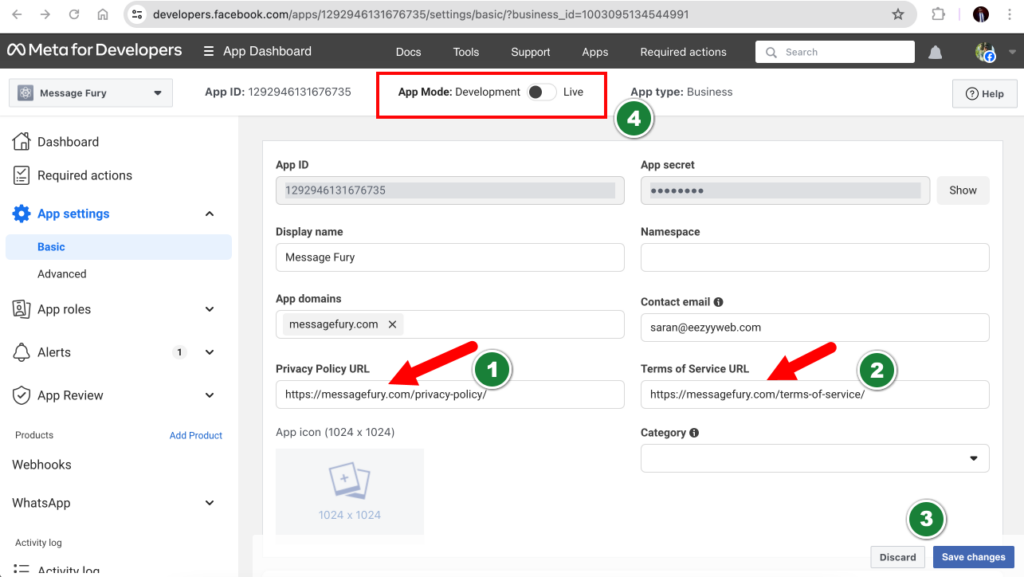
- Scroll down on the left menu and you will find a menu named “WhatsApp“
- Click on “API Setup” under the WhatsApp menu.
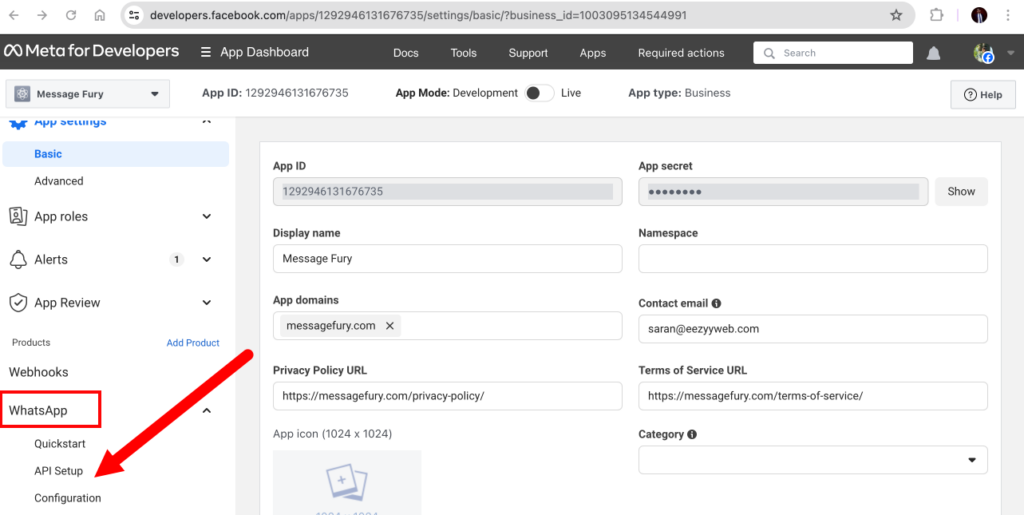
- On the next page, you will find the Temporary Access Token, a Test Phone Number, a Phone Number ID, and a WhatsApp Business Account ID.
- You can copy all these details and configure the same in your MessageFury Panel under settings (https://mc.messagefury.com/settings) to start sending WhatsApp Messages.
- Note: You need to generate a Permanent Access Token and add a valid phone number to start sending messages to unknown numbers.
- Until then you can send messages up to only 5 numbers and you need to verify those numbers in the next step and you can use it for testing purposes.
Once your phone number is verified, this restriction will be removed. - You need to verify your business portfolio to get the permanent access token which will be explained in the upcoming steps.
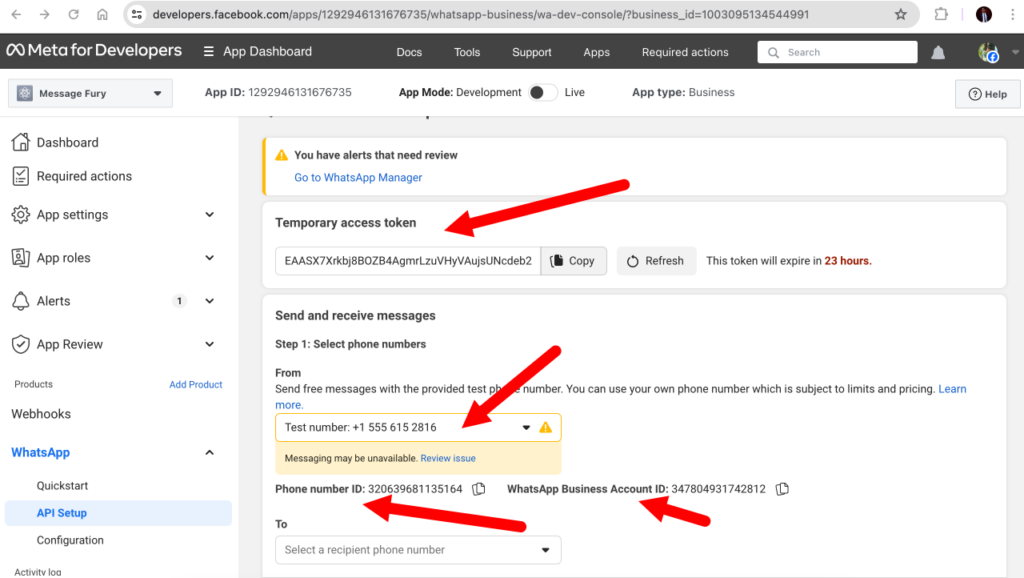
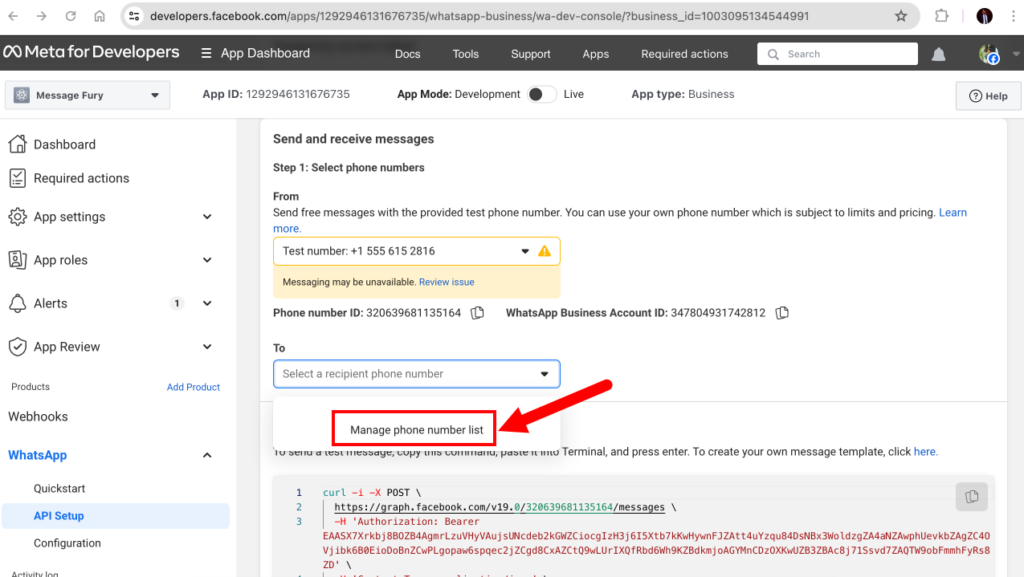
- Click on “Manage Phone Number List” and you will be provided with the option to add up to 5 contact numbers that you can use for sending test messages.
- Once you add a valid phone number by following the next step, these restrictions will be removed.
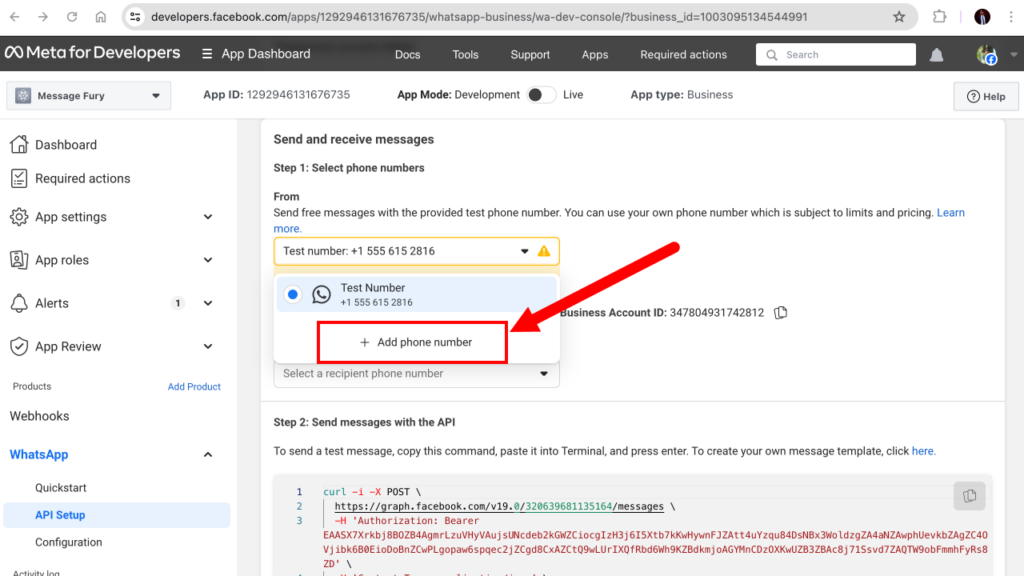
- You can click on the test phone number and there will be an option for you to add a valid phone number.
- You can purchase a new phone number and configure it over here or you can use any other existing phone numbers as well.
- Make sure that this phone number is not linked with any other existing WhatsApp account of any type.
In case you have used this number in the past for WhatsApp, make sure to delete that WhatsApp account before configuring it with the Official Business WhatsApp API. - We highly recommend you to add this number once your business portfolio is verified.
This is because, you will enter the Display Name for WhatsApp in the next step and if your business portfolio is not verified, your display name will be disapproved. - You will also receive an OTP in the new number.
So, make sure to keep the phone number active when you try to add a new phone number.
Step 5: Verify the Business Portfolio #
- Go to https://business.facebook.com/
- Make sure the proper business portfolio is selected.
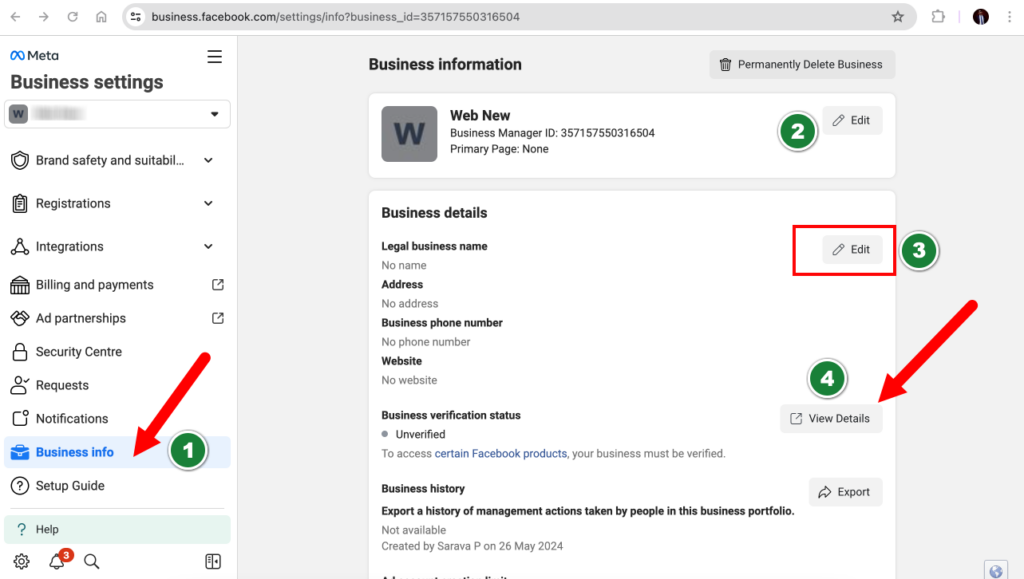
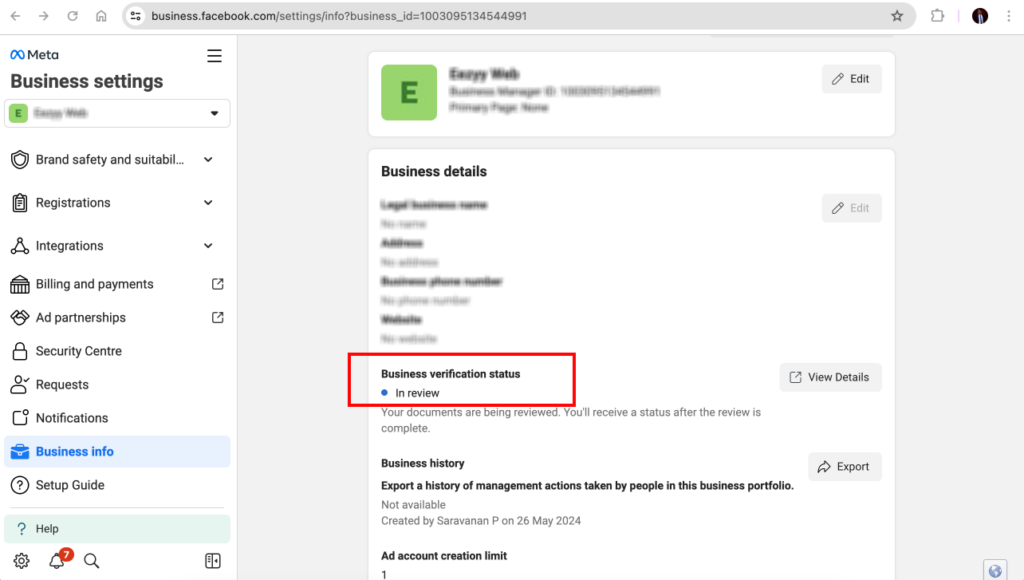
- If you scroll down the left side menu bar, you will find the menu named “Business Info“
- You can edit the app name section and link this app with a Facebook page as well
- Click on the “Edit” button below and enter the legal business name, registered address, phone number, and website. Make sure to mention the Exact Business Name and the registered address in the Official documents as you need to upload those documents in the next steps.
- Once these details are entered click on Save and then click on View Details below
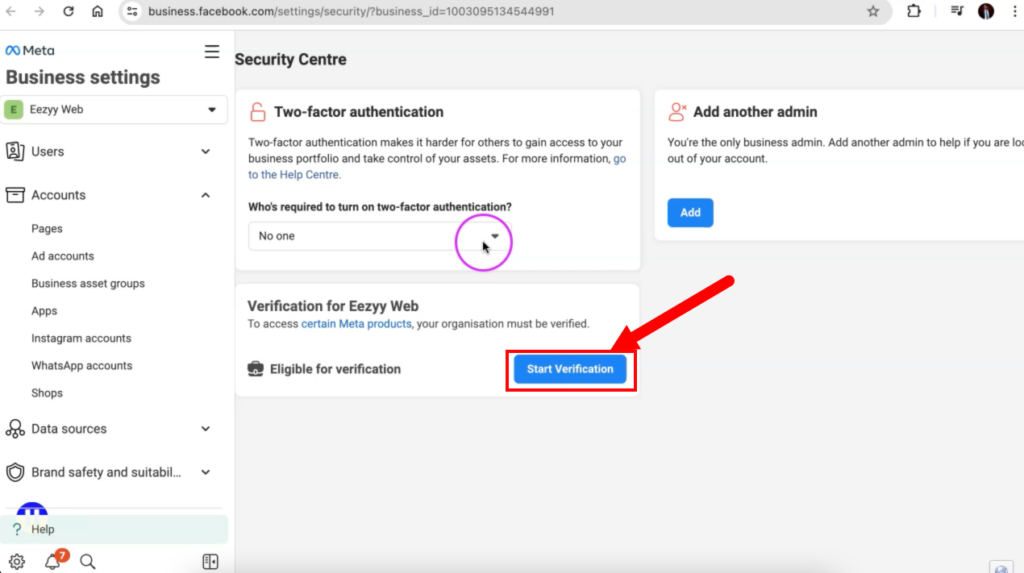
- In the next page, you will find the “Start Verification” button
- Once you click on Start Verification, you will be directed to the next steps where your official email address, contact number, and registration documents will be verified.
- Once you verify your contact details and submit all the necessary documents, your business portfolio will be reviewed by the Meta Team.
- It might take 2 to 5 working days to finish the review process. We cannot provide any fixed timeline for the same.
- You will find the status as “In Review” under the Business Info section once this process is completed.
- With this, the business portfolio process is completed. In case, if your business portfolio is rejected for any reason, the Meta team will send you an email with the reasons and you need to provide sufficient documents to finish the verification.
Step 6: Generate Permanent Access Token #
- Go to https://business.facebook.com/settings/
- Select the Business Portfolio for which the WhatsApp based App was created
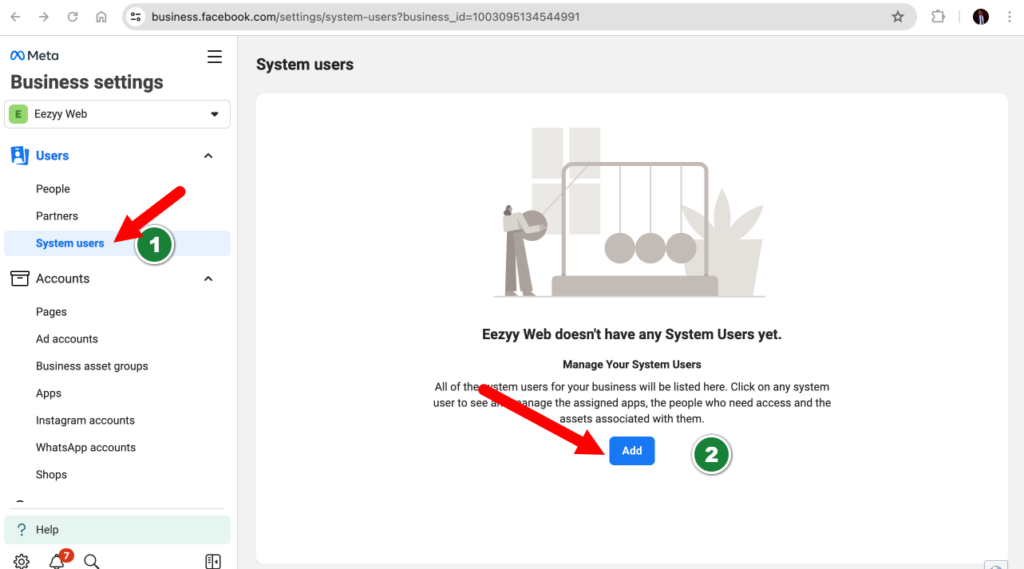
- Under Users, click on System Users
- And then click on Add in order to create a new system admin user
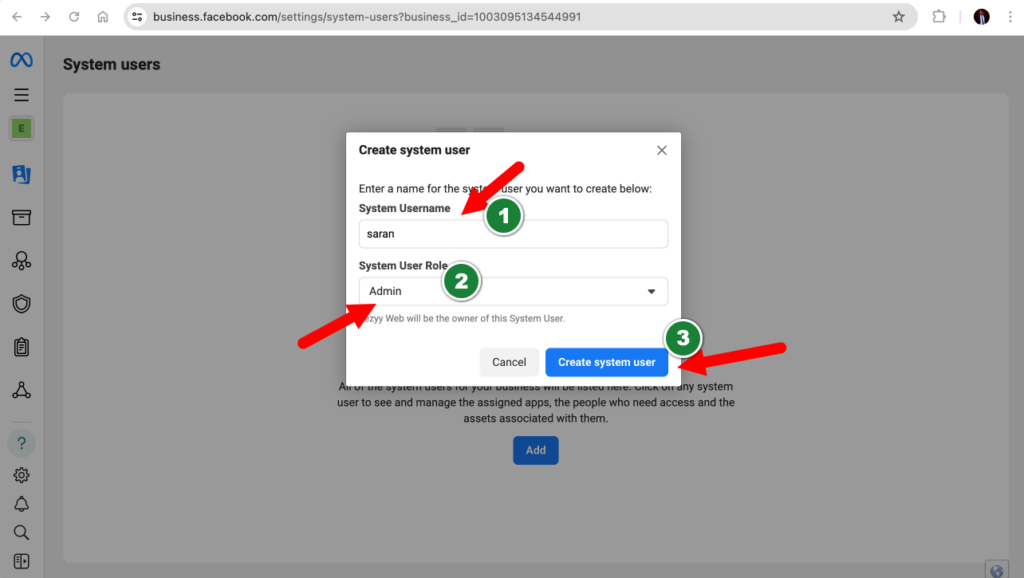
- In the next page, you can enter any reference Admin Username
- Then select the system user role as Admin
- Click on Create System User
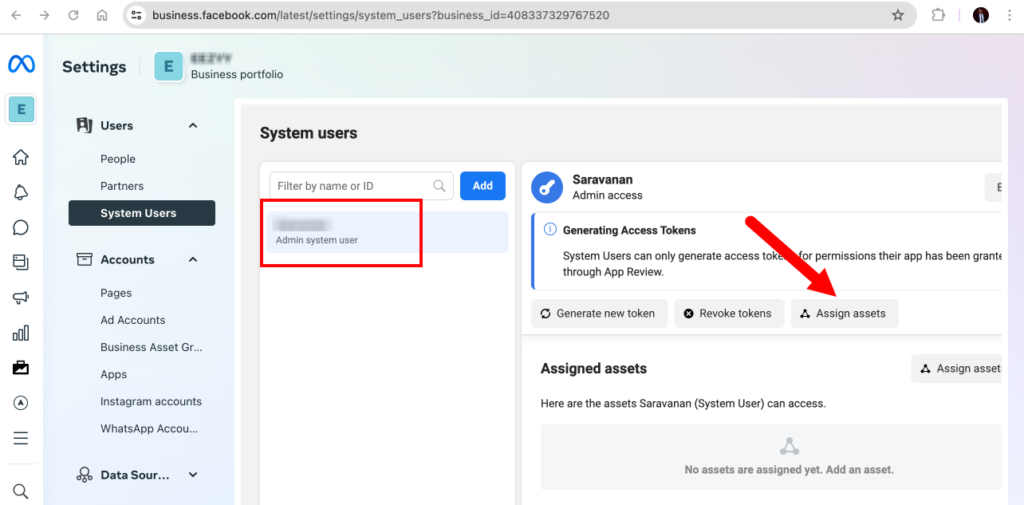
- Once the system admin user is created, select the created admin user.
- Then click on Assign Assets
- You will be redirected to the System Users page
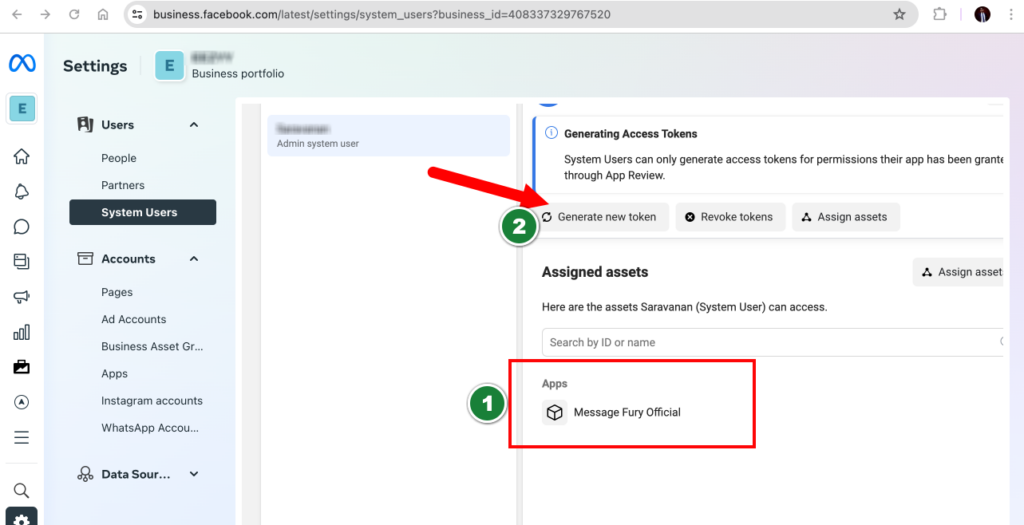
- Check whether the App is assigned under the System Admin User
- Then click on Generate New Token
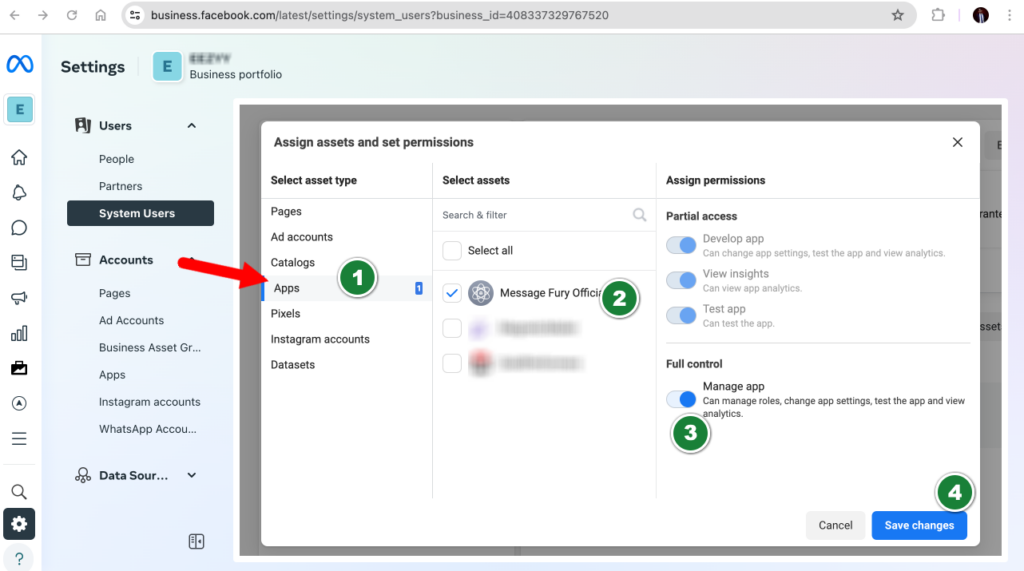
- In the next step, select App under the Asset Type
- Under assets, select the WhatsApp App that we have created.
- Under assign permission, select Full Control
- And then, click on Save Changes
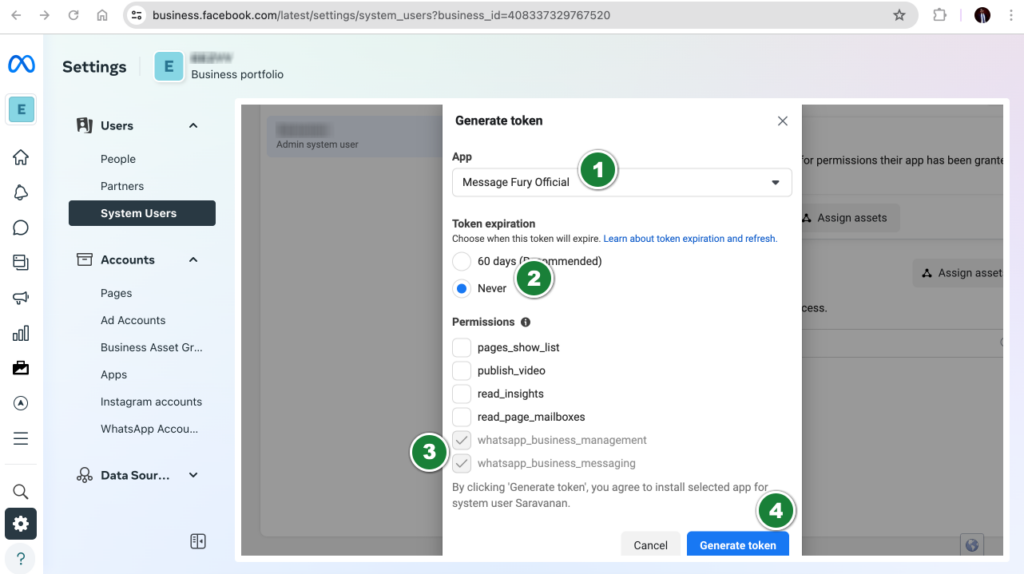
- On the next page, make sure the correct App is selected
- Under token expiration, select Never
- Under permissions, select those 2 permissions for WhatsApp which are selected in the screenshot below.
You need to scroll down to the bottom to select these 2 permissions - And then, click on Generate Token
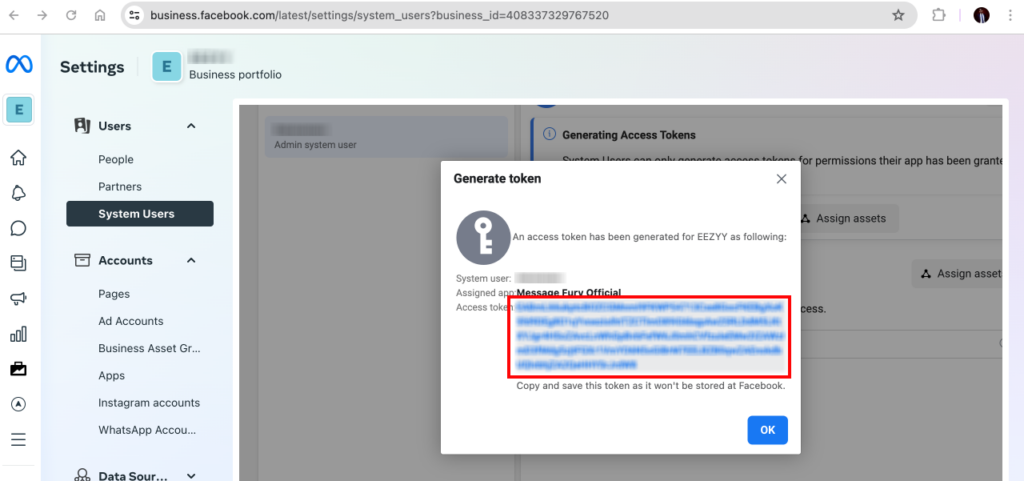
- You will get the Permanent Access Token on the Next Screen.
- Copy this token and add it to the settings page (https://mc.messagefury.com/settings) of MessageFury under “Access Token“.
- You can remove the temporary access token and add this permanent access token over here.
The WhatsApp Cloud API Setup is completed. If you follow the above steps properly, you can easily perform the settings on your own.
You can also refer to our video tutorial on performing this setup.
For any assistance, click here to raise a support ticket.


